Creating and attaching volumes using Horizon

OpenStack uses volumes to store data. Think of volumes as a hard disk that you can attach at will to one of your virtual servers. There are a few steps to attach these to an instance, that will be detailed here.

First, you need to log into the advanced control panel - called Horizon by selecting the advanced interface box. This box has a link to the Horizon login and your username and password

Go to Horizon and put your details in:

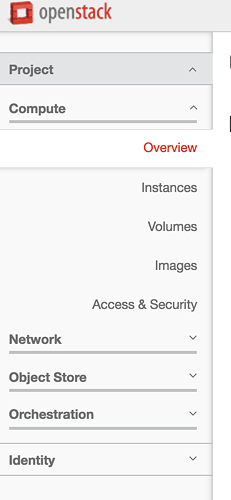
You can then view the volumes by clicking on the volumes button, located on the left of the screen you are presented with once you are logged in:

This will give you a list of all the volumes that are part of your project;

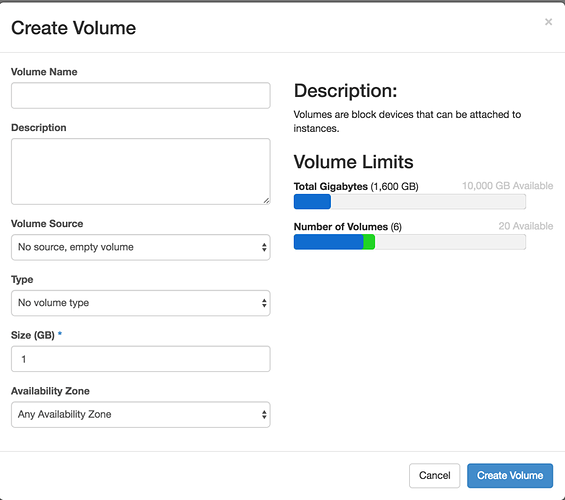
To create a volume, select the “Create Volume” button, located to the top right of the list of volumes

This will present you with a form to fill in:

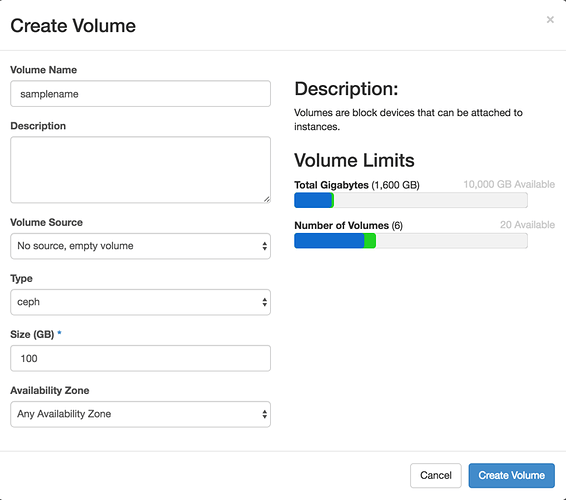
Provide a volume name, select “ceph” from the volume type and input the size you want the volume to be. The interface tells you how much of your quota this will use;

Once you are happy, hit create volume, and a new volume will appear at the top of your list:

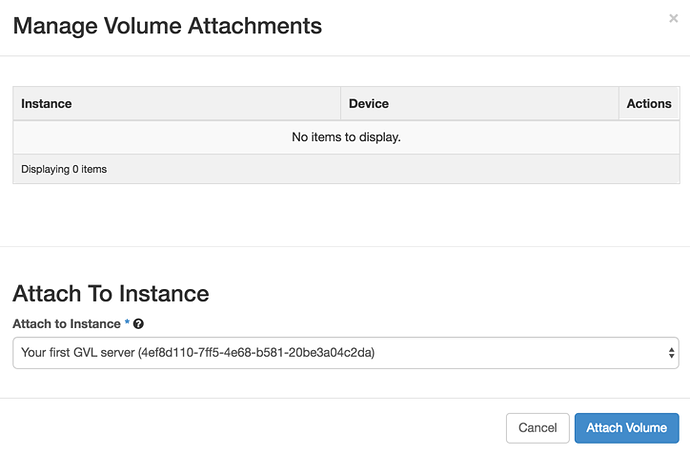
To attach this to a VM, you need to tell openstack to do this;
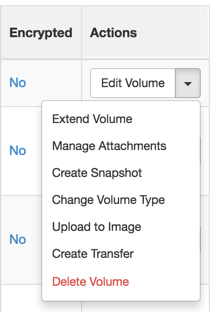
select ‘Manage Attachments’ and then choose the instance you want to attach it to;

This will then show it is attached;

at this point you can log into the system, format and mount the volume.


First, find the device ID of the volume that you’ve just attached:

lsblk

sda    253:0    0  120G  0 disk 
└─sda1 253:1    0  120G  0 part /
sdb    253:16   0    2T  0 disk /home/ubuntu/sdb
sdc    253:32   0    2T  0 disk 

Here the there are two attached volumes: /dev/sdb, which is already mounted, and dev/sdc, which has just been attached.

Next, create a filesystem on the newly attached volume…

Creating a filesystem on a volume is DESTRUCTIVE, see the WARNING below! To create a filesystem, run the command:

sudo mkfs.xfs /dev/sdc

This will create the filesystem. Then you can mount the volume in your space:

mkdir example
sudo mount /dev/sdc example/

because the volume will have been mounted as root, you need to make sure that your user has ownership. In this example the user is ubuntu:

sudo chown ubuntu:ubuntu example/

At that point you should be able to use the volume you have created;

lsblk

NAME   MAJ:MIN RM  SIZE RO TYPE MOUNTPOINT
sda    253:0    0  120G  0 disk 
└─sda1 253:1    0  120G  0 part /
sdb    253:16   0    2T  0 disk /home/ubuntu/sdb
sdc    253:32   0    2T  0 disk /home/ubuntu/example

WARNING!

After you reboot your instance, your volumes will be UNMOUNTED but still ATTACHED.

To remount them, simply

lsblk

To find the device name (looks like /dev/sdX), then

mount /dev/sdX [mountpoint]
DO NOT RUN mkfs.xfs OR fdisk ON A VOLUME THAT CONTAINS DATA, IT WILL DESTROY ALL DATA ON THE VOLUME!


Here is another recipe example from Nick (that doesn’t require the fdisk):

sudo mkfs -t ext4 /dev/vde
sudo mkdir /data3
sudo mount /dev/vde /data3

Hello

I am having issues attaching 2 new volumes (50Gb and 150Gb) to a new instance (UoB2). In horizon I get the message “attaching” but my volumes still do not appear to be attached to UoB2 even after restarting horizon and rebooting the instance. Is there a fault or is there something else I need to do?

Thanks,
Ed

Looking into this for you Ed

You are doing it right, this is an Openstack issue. I’m working on it.

Maciej

1 Like

I’ve changed some system settings, so you should be able to attach a volume properly to newly created VMs. However, if you want to attach it to the UoB2, it needs more work from my side.

Let me know what you prefer to do - to launch a new VM or to have the old one fixed?

Maciej

Thanks. If possible, I would like to attach vols to UoB2 (as I’ve installed some software onto this instance that took considerable effort/ time…). For now I will store any important data on my local network, off CLIMB.
Ed

In order to do so, I need to restart your VM (at least once), preferably today. Is it OK?

That’s fine, I am offline now

Case summary: For anyone having problem with attaching a volume to a running VM - please shut down your VM first and try to attach it to the stopped instance. Then start it again and follow tutorial above (create partition and so on).

This is a necessary workaround until a fix is released by libvirt software maintainers.

Apologies for my ignorance, Ive beeing trying to use a volume attached to the PoreCamp2017 instance for the last few days and keep geeting this error: sudo: unable to resolve host pore2017, my instance is pore2017

probelm is I need the space on the vol for nanopore processing and cant get programmes to run within it ,
outside the mount I can run programmes and eveything is fine. I googled this and there were suggestions about modifyng different… files ect . but im sure this should work as is. Is this a known problem. thanks garry.

Hi Garry - the “sudo: unable to resolve host” message is a known problem. It doesn’t affect the command that you’re running and is just informational.

You can make it go away by adding the hostname of your instance to the /etc/hosts file. Find the hostname of your instance by running the command

hostname

then paste this into /etc/hosts at the end of the the line that starts with “127.0.0.1 localhost”.

In your case, the line will end up looking like this:

127.0.0.1 localhost pore2017

You can edit /etc/hosts using sudo nano /etc/hosts.


Your volume problem isn’t one that I’ve come across before, so I’ll need a bit more information to help you troubleshoot it. Could you paste the output of:

  1. lsblk
  2. ls -ld /path/to/volume/mountpoint
  3. $PATH

Hi,

I have been trying to add a new volume to my instance but I am having problems following these instructions (I am not a bioinformatician or programmer!).

I have got as far as ‘mkdir example’, but I have no idea what ‘example’ refers to, and when I tried entering something I get the message 'cannot create directory ‘Evans2’: no space left on device

Please help!

Ben

Hi Ben

mkdir example

Is an example of a Linux command. You can see it has two parts; mkdir and example.

The first part

mkdir

is the command for creating a directory - mk = make, dir = directory.

The second part

example

is an option that we are providing to the command mkdir that specifies the name of the directory we want to create. Generally, we try to specify directory names without spaces or special characters so that they are interpreted correctly by the mkdir command. Here, “example” means exactly that - a made up directory name that you’re free to replace with whatever you want, but remember that you’ll need to do this for downstream commands as well, or you’ll be referring to a directory that doesn’t exist!

The error message you’re seeing implies that you have run out of space on your instance root disk. Linux hates running out of disk space, so you will need to delete a file or two before you can add the new volume. Once you free up a bit of space, the error message should go away, and you’ll be free to continue to move data onto your new volume.


You definitely don’t need to be a bioinformatician or programmer to use the Linux command line, but you might find you’ll benefit from having a go at this great Software Carpentry tutorial to help get accustomed to how the command line works.

Hi Matt,

Thanks for this. I managed to get through the rest of the instructions. However, I think I have now deleted most of my data by mistake! I thought that I had created a second volume on which all my data had been duplicated, so I started deleting it off there, only to find it had disappeared from my original volume as well. Is there any way I can undo this?

Best wishes,

Ben

Hi Ben - that’s annoying! Could you please try following the information here, to establish whether you’ve unmounted a volume somewhere?

If you could post the output from df and lsblk, I might be able to give you some more information, but if you’ve formatted a volume with data on it, its gone forever I’m afraid!

Hi Matt,

Output is as follows:

ubuntu@evans:~$ df -h
Filesystem Size Used Avail Use% Mounted on
udev 16G 8.0K 16G 1% /dev
tmpfs 3.2G 6.8M 3.2G 1% /run
/dev/vda1 119G 34G 80G 30% /
none 4.0K 0 4.0K 0% /sys/fs/cgroup
none 5.0M 0 5.0M 0% /run/lock
none 16G 72K 16G 1% /run/shm
none 100M 12K 100M 1% /run/user
cm_processes 16G 0 16G 0% /run/cloudera-scm-agent/process
ubuntu@evans:~$ lsblk
NAME MAJ:MIN RM SIZE RO TYPE MOUNTPOINT
vda 253:0 0 120G 0 disk
└─vda1 253:1 0 120G 0 part /
loop0 7:0 0 100G 0 loop
└─docker-253:1-655369-pool (dm-0) 252:0 0 100G 0 dm
loop1 7:1 0 2G 0 loop
└─docker-253:1-655369-pool (dm-0) 252:0 0 100G 0 dm

After I had run through the initial process a new directory within ‘Evans’ appeared called ‘Evans2’ (which is what I had named the second directory), and within it seemed to be everything that was in ‘Evans’. I thought it had duplicated everything across. I therefore manually deleted everything from within ‘Evans2’, but then when I went back up a level to ‘Evans’, all the directories had been deleted from there as well.

Right - you don’t actually have a new volume attached to your instance.

I can see that you’ve made a new volume, but it doesn’t look like its attached to your instance (it would appear as /dev/vdb in the output from lsblk). I’ve quoted the relevant section of the OP tutorial below - if you follow stages, you can attach your volume to your instance.

Hi Matt,

I’ve tried this several times, and while I don’t get any error messages, and it says it is attaching the volume, it never seems to attach it, and the ‘attached to’ box for the new volume on openstack remains empty.

Given this though, I guess that means I have permanently deleted the data from my other volume?

Best wishes,

Ben

Hi Ben,

Thanks for the additional info - I’ve rebooted your instance and attached your new volume. It should appear in the output of lsblk now, ready for you to format, make a filesystem and mount.

I’m afraid that if you deleted the data in the original directory and the volume wasn’t mounted where you thought it was, you might’ve lost data here. Apologies, but we don’t have any way of recovering user-deleted data.

If something isn’t working in the way you think it should be, please get in touch before you rm -rf anything! We’re here to help with any problems, whether the underlying system isn’t working as it should, or you need some help with the tutorials.